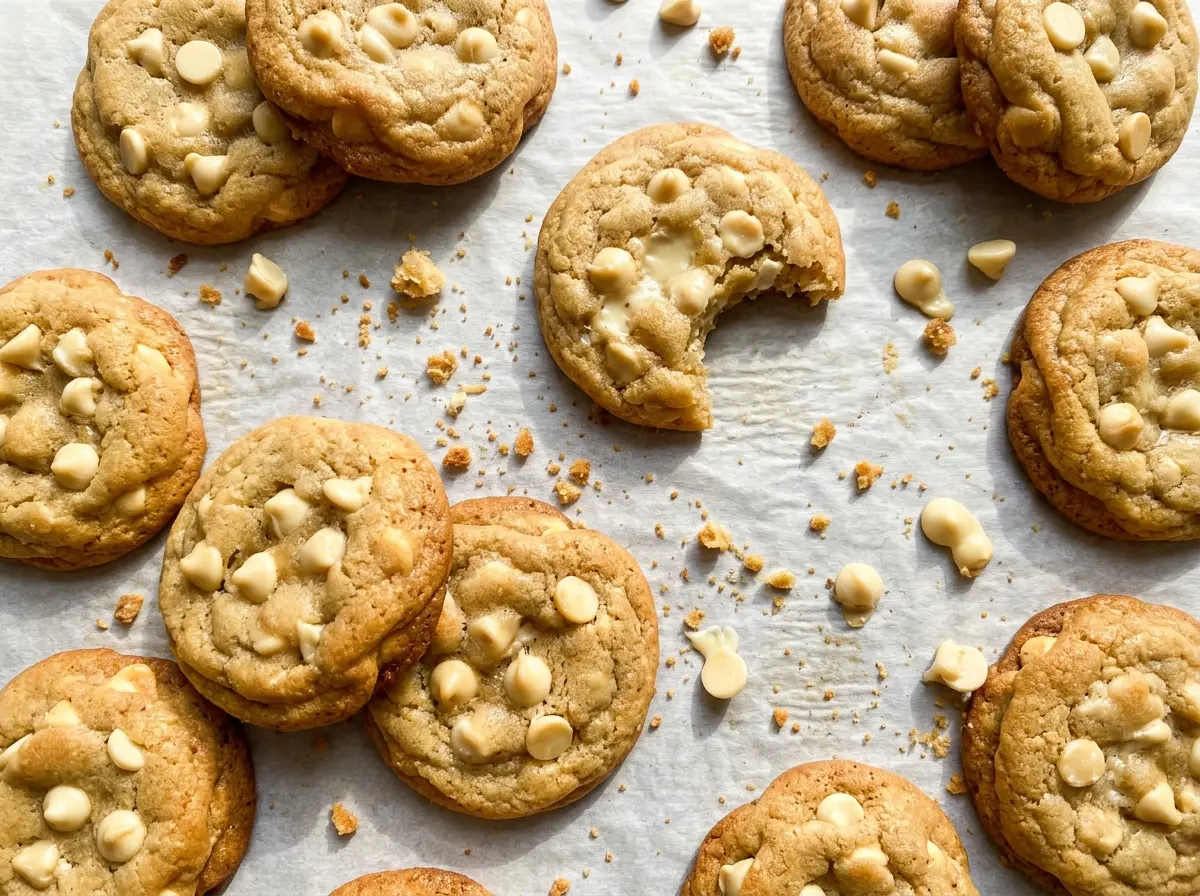
The edges turn pale gold before the middle looks settled, and that’s exactly when I take these white chocolate chip cookies out of the oven. Leave them there until the tops look firm and you’ll miss the soft, tender center that makes this dough worth chilling. The cookies finish setting on the hot baking sheet, so a little softness in the middle is a good sign, not a reason to keep baking.
I use both brown sugar and granulated sugar for a cookie that stays soft without tasting heavy. An extra egg yolk adds richness, while the white chocolate chips bring sweet, creamy pockets to each bite. Keep the butter softened, not melted, and give the dough its full chill before scooping.
The dough is straightforward to mix, but those small details matter: a light hand with the flour and a properly cooled baking sheet between batches help keep the cookies tender and evenly baked.
Kitchen Note
Let the baking sheet cool completely before the next batch goes on. A warm sheet starts softening the dough before it reaches the oven, which can make later cookies spread more than the first ones.
Save these white chocolate chip cookies for their soft centers and lightly golden edges—this dough is easy to bake in batches.
Why Chilling Keeps These Cookies From Spreading Too Thin
Softened butter is easy to cream with sugar, but dough made with it is also pliable. If that dough goes straight into the oven, the butter warms and melts quickly, giving the cookies less time to hold their shape. A 30-minute chill firms the dough before baking, helping the cookies spread at a steadier pace instead of racing outward into thin, crisp rounds.
The sugar balance matters, too. Brown sugar holds moisture and gives the centers a softer chew, while granulated sugar helps the edges bake up with a little structure. The extra yolk brings richness without adding the water from another egg white. Together, those choices give you a cookie that can look soft in the middle when it comes out but won’t stay raw or collapse as it cools.
Resist the urge to correct soft dough with a handful of extra flour. That can make the finished cookies dense. Chilling is the useful adjustment here: it firms the butter without changing the balance of the dough.
What the Butter, Sugars, and White Chocolate Bring to the Dough

- All-purpose flour — It gives the cookies enough structure to hold the chips and set around a soft center. A regular, economical all-purpose flour works well; specialty flour isn’t needed. For a gluten-free batch, use a cup-for-cup gluten-free baking blend formulated for cookies, as described below, knowing the texture won’t be identical to a wheat-flour cookie.
- Unsalted butter — Butter carries the dough’s rich flavor and helps create its tender texture. Use it softened so it creams smoothly with the sugars; melted butter changes how the dough behaves. Unsalted butter also lets the fine salt in the dough season the cookies without depending on the varying salt levels of salted butter.
- Light brown and granulated sugars — Brown sugar contributes moisture and a mild molasses note, while granulated sugar balances it with a cleaner sweetness. Fresh, soft brown sugar blends more evenly than a dried-out lump. Dark brown sugar can stand in for light brown sugar if you want a deeper molasses taste, though the cookies will taste less delicate.
- Egg and egg yolk — The whole egg binds the dough, and the extra yolk contributes richness and a tender bite. Bring them to room temperature so they blend into the creamed butter without leaving the mixture uneven. Replacing the yolk with another whole egg adds extra white and changes the texture.
- Vanilla extract — Vanilla rounds out the sweetness of the white chocolate. A standard bottle is perfectly suitable here; the chips and brown sugar are the stronger flavors, so an expensive extract isn’t necessary for a good batch.
- White chocolate chips — Chips hold their shape in the oven and leave distinct creamy bites throughout the cookies. Choose a brand you enjoy eating, since the chocolate is a prominent part of each bite. Chopped white chocolate can replace the chips for more varied pieces and a few softer, melted edges.
Mixing and Baking the Dough Without Tough Cookies
Get the oven and dry ingredients ready
Heat the oven to 350°F and line a large baking sheet with parchment paper. Whisk the flour, baking soda, and fine salt together in a medium bowl so the leavener is distributed through the flour. Whisk until the mixture looks uniform, breaking up any visible clumps. Setting this bowl aside now keeps you from overworking the dough later.
Cream the butter and sugars until fluffy
Beat the softened butter with both sugars on medium speed for about 2 minutes, until the mixture looks lighter and fluffy. Scrape down the bowl as needed so butter along the sides gets incorporated. Add the room-temperature egg, yolk, and vanilla, then beat just until combined. If the mixture looks a little uneven at first, scrape the bowl and mix briefly rather than continuing to beat for a long time.
Finish the dough gently, then chill
Add the flour mixture and mix on low only until no dry flour remains. Stop as soon as the flour disappears; mixing longer can develop gluten and make the cookies tougher. Fold in the white chocolate chips so they’re spread through the dough without crushing them. Cover the bowl and chill the dough for 30 minutes.
Bake until the edges are lightly golden
Scoop rounded 2-tablespoon portions onto the prepared sheet, spacing them about 2 inches apart so they have room to spread. Bake at 350°F for 9–12 minutes, looking for lightly golden edges and centers that still appear slightly soft. Let the cookies cool on the baking sheet for 5 minutes before moving them to a wire rack; they’re delicate while hot. Cool the baking sheet completely before adding the remaining dough, then bake each batch for 9–12 minutes and give each batch the same 5-minute rest on the sheet.
Easy Changes for Different White Chocolate Cookies
Make a gluten-free batch
Replace the all-purpose flour with a cup-for-cup gluten-free baking blend formulated for cookies, preferably one that includes xanthan gum. Follow the blend’s equivalent for the flour amount in this dough. The cookies will still have the brown sugar and white chocolate sweetness, but their crumb may be a little more delicate than the all-purpose-flour version.
Use chopped white chocolate
Swap the chips for chopped white chocolate. The uneven pieces give you a mix of small creamy pockets and larger melted patches, so the cookies look a little more rustic than a batch made with uniform chips.
Use dark brown sugar for a deeper note
Replace the light brown sugar with dark brown sugar in the same amount. Its stronger molasses flavor makes the cookies taste richer and more caramel-like, which stands out nicely against the sweet white chocolate.
Storage and Reheating
- Refrigerator: Keep the cookies in an airtight container for up to 5 days. They’ll firm up in the refrigerator; let them come to room temperature for a softer bite.
- Freezer: Freeze baked, fully cooled cookies in an airtight container for up to 3 months. Thaw at room temperature before serving.
- Reheating: Warm cookies in a 300°F oven for 3–4 minutes if you’d like them warm. Don’t microwave them for long, since the white chocolate can overheat.
Questions That Come Up While Baking These Cookies
White Chocolate Chip Cookies
Ingredients
Equipment
Method
- Heat the oven to 350°F.
- Line a large baking sheet with parchment paper.
- Whisk the flour, baking soda, and salt together in a medium bowl.
- In a large bowl, beat the butter, brown sugar, and granulated sugar on medium speed until light and fluffy, about 2 minutes.
- Beat in the egg, egg yolk, and vanilla until combined, scraping down the bowl as needed.
- Add the flour mixture and mix on low just until no dry flour remains.
- Fold in the white chocolate chips.
- Cover the dough and chill for 30 minutes.
- Scoop rounded 2-tablespoon portions onto the prepared baking sheet, spacing them about 2 inches apart.
- Bake for 9–12 minutes, until the edges are lightly golden and the centers still look slightly soft.
- Let the cookies cool on the baking sheet for 5 minutes.
- Transfer the cookies to a wire rack.
- Let the baking sheet cool completely.
- Bake the remaining dough in batches at 350°F for 9–12 minutes per batch.
- Cool each batch on the sheet for 5 minutes before transferring to a wire rack.