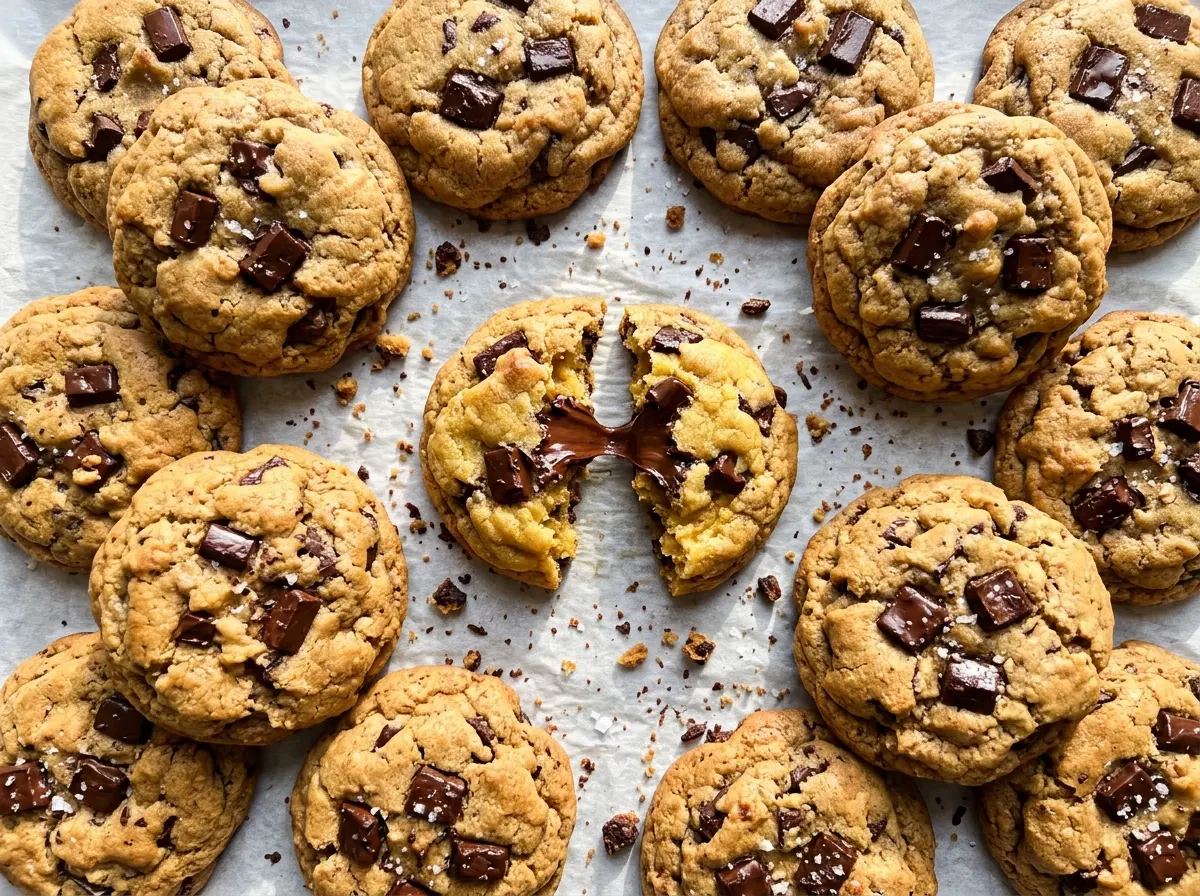
The edges are the first thing I watch when these cookies go into the oven: they should turn golden while the centers still look soft. That little contrast is what gives you a cookie with a tender middle instead of a dry, crunchy bite. I make 30 from a batch, with semisweet chocolate chunks tucked through the dough so there’s chocolate in every bite.
Chilling the dough for 30 minutes makes it easier to portion and gives the softened butter time to firm up before baking. I keep the mixing gentle once the flour goes in, too; the dough only needs to come together, not be worked like bread dough. You’ll get golden edges, soft centers, and pockets of chocolate that stay just a little gooey while the cookies cool.
Kitchen Note
Pack the brown sugar firmly into the measuring cup, then level it off. A loosely filled cup changes the dough’s moisture balance, and packing it gives you a more consistent batch.
Save these chocolate chunk cookies for your next baking day: golden edges, soft centers, and plenty of semisweet chocolate in every batch.
Why Adding More Flour Won’t Fix Sticky Cookie Dough
Cookie dough made with softened butter starts out pliable, and it can feel sticky before it’s chilled. That doesn’t mean it needs extra flour. Adding more flour changes the balance of the dough and can make the baked cookies dry or dense, when the issue is simply that the butter is still soft.
A 30-minute rest in the refrigerator firms the butter and makes the dough easier to scoop into neat portions. It also helps the cookies hold their shape as they bake instead of spreading too quickly. Keep the bowl covered while it chills, and resist the urge to keep mixing or dusting the dough with flour just to make it feel less tacky. Once chilled, it should be manageable with a scoop or spoon while still feeling soft.
This pause is short enough to fit into the usual baking rhythm: the oven heats and the baking sheet gets lined while the dough rests. You don’t need to chill it overnight to get the benefit. The dough should be cool enough to portion cleanly, not hard like a block of butter.
What the Butter, Sugars, and Chocolate Bring to These Cookies

- All-purpose flour — It gives the dough enough structure to hold the chocolate chunks without making the cookies cakey. A measure-for-measure gluten-free baking blend is the most practical swap; the texture may be a little more tender or sandy, depending on the blend.
- Unsalted butter — Softened butter creams smoothly with the sugars and helps create the cookie’s rich, tender crumb. For a dairy-free batch, a firm dairy-free baking stick can replace it measure for measure; tub-style spreads tend to contain more water and can change how the cookies spread.
- Brown and granulated sugars — Brown sugar contributes moisture and a mellow molasses note, while granulated sugar helps the edges brown. Dark brown sugar can replace light brown sugar in the same measure for a deeper molasses flavor and a slightly softer cookie.
- Eggs — Room-temperature eggs blend more evenly into the creamed butter and sugar. Set them out before you begin so they’re not cold when they go into the bowl.
- Vanilla extract — It rounds out the sweetness and gives the dough its familiar bakery aroma. Pure extract has a fuller flavor, but imitation vanilla works in the same measure if that’s what you keep on hand.
- Semisweet chocolate chunks — Chunks make irregular pockets of chocolate throughout the cookies. Bittersweet chunks are an easy swap if you prefer a less-sweet bite; choose a chocolate you enjoy eating on its own.
- Baking soda — This is the leavener that helps the cookies rise and brown. Use baking soda rather than baking powder here; they aren’t interchangeable in this dough.
The 30-Minute Chill and the Bake That Follows
Whisk the dry ingredients evenly
Whisk the flour, baking soda, and salt together in a medium bowl before they meet the butter mixture. This spreads the leavener through the flour, so you don’t end up with a concentrated patch in one cookie. Break up any flour clumps with the whisk as you go. Set the bowl aside while you cream the butter and sugars.
Cream the butter and sugars, then add the eggs
Beat the softened butter with both sugars on medium speed until creamy, about 2 minutes. Scrape down the bowl if you see unmixed butter clinging to the sides, then beat in the eggs one at a time. Mix in the vanilla after the eggs are incorporated. The mixture should look creamy; if it looks slightly uneven for a moment, keep mixing until it comes together.
Bring the dough together without overworking it
Add the flour mixture and mix on low speed just until no dry streaks remain. Stop as soon as the flour disappears; continued mixing can make the cookies tougher. Fold in the chocolate chunks so they’re spread through the dough without crushing them. Cover the bowl before chilling.
Chill while the oven heats
Refrigerate the covered dough for 30 minutes. During that time, heat the oven to 350°F and line a baking sheet with parchment paper. The dough should feel firmer and easier to portion after its rest. If it’s still soft, give it a little more time in the refrigerator rather than adding flour.
Bake until the edges are golden
Scoop the dough into 2-tablespoon portions and set them about 2 inches apart on the prepared baking sheet. Bake in batches for 10–12 minutes, watching for golden edges and centers that still look soft. Don’t wait for the centers to look completely firm in the oven; the cookies continue setting as they cool. Leave them on the baking sheet for 5 minutes, then transfer them to a wire rack to cool completely.
Dairy-Free, Half-Batch, and Other Smart Changes for These Cookies
Make the cookies dairy-free
Replace the butter with a firm dairy-free baking stick in the same measure, and use dairy-free semisweet chocolate chunks. The cookies will still contain eggs, so this change makes them dairy-free, not vegan. The flavor may be a little less buttery, and the spread can vary with the brand of baking stick.
Bake a half batch
Halve each ingredient for a smaller batch of about 15 cookies. Keep the same 2-tablespoon portions and spacing, and use the same baking temperature and time range; the portions are still the same size, so look for golden edges and soft centers rather than changing the bake based on the smaller batch.
Storage and Reheating
- Refrigerator: These cookies don’t need refrigeration. Keep them in an airtight container at room temperature for up to 4 days; refrigerating them can make the texture firmer.
- Freezer: Freeze completely cooled cookies in an airtight container, with parchment between layers, for up to 2 months. Thaw at room temperature before serving.
- Reheating: Warm thawed cookies in a 300°F oven for 4–5 minutes. The microwave can soften them unevenly, so use it only if you don’t mind a softer, less crisp edge.
The Questions That Come Up When Baking Chocolate Chunk Cookies
Chocolate Chunk Cookies
Ingredients
Equipment
Method
- Whisk the flour, baking soda, and salt together in a medium bowl.
- Beat the butter, brown sugar, and granulated sugar with an electric mixer on medium speed until creamy, about 2 minutes.
- Beat in the eggs one at a time.
- Mix in the vanilla extract.
- Add the flour mixture and mix on low speed just until no dry streaks remain.
- Fold in the chocolate chunks.
- Cover the dough and refrigerate for 30 minutes.
- Meanwhile, heat the oven to 350°F.
- Line a baking sheet with parchment paper.
- Scoop the dough into 2-tablespoon portions and arrange them about 2 inches apart on the baking sheet.
- Bake in batches for 10–12 minutes, until the edges are golden and the centers still look soft.
- Let the cookies cool on the baking sheet for 5 minutes.
- Transfer the cookies to a wire rack to cool completely.