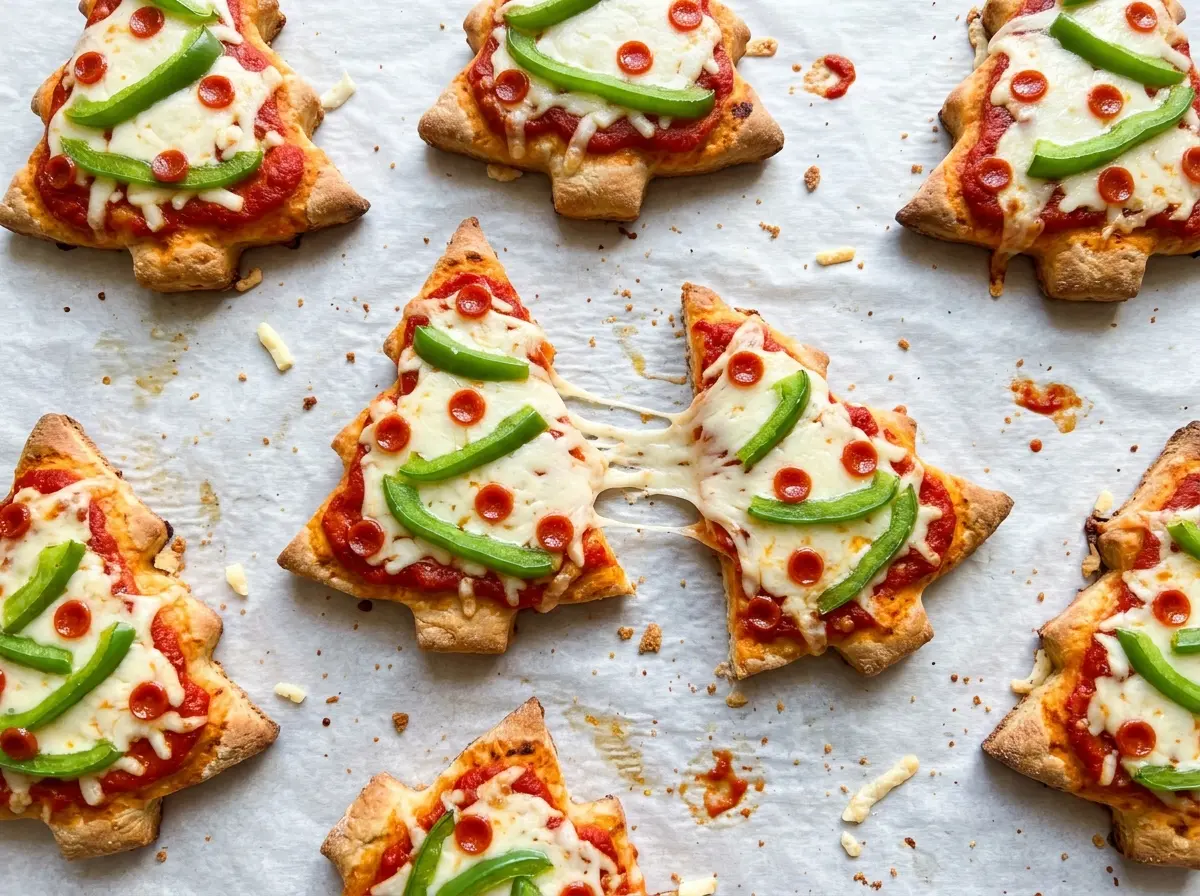
The dough relaxes under your hands as you press the branches into shape, and that’s when these little pizzas start to look like Christmas trees instead of ordinary rounds. Each one is about 4 inches tall, with a pointed top, stepped branches, and a short trunk. The Christmas Tree Mini Pizzas bake up with bubbling mozzarella, bits of pepperoni, and green bell pepper tucked across the surface.
I like this format because every portion is its own little pizza, so it’s easy to give the toppings an even share. The dough needs to be at room temperature before shaping; cold dough pushes back and can make those narrow branches harder to form. Once the trees are on their baking sheets, a measured spoonful of sauce keeps the dough covered without burying its outline. The finished edges turn golden while the cheese bubbles, and the green pepper gives each tree its unmistakable shape.
Kitchen Note
Switch the baking sheets between the upper and lower racks halfway through, and rotate each sheet at the same time. That small bit of attention helps the two pans brown more evenly while the cheese bubbles.
Save these Christmas Tree Mini Pizzas for a festive snack with golden mozzarella, pepperoni, and little green-pepper branches.
Why Pressing Each Tree From One Piece Helps It Hold Its Shape
These aren’t cut-out pizzas with leftover scraps pressed back together. Each tree comes from one portion of dough, so the branches and trunk stay connected as the dough puffs in the oven. Pressing the dough into a stepped outline also lets you control the silhouette without trimming away the edges. Aim for branches that are broad enough to hold toppings, not thin points that disappear under the cheese.
The topping placement matters, too. A mound in the middle can hide the tree shape, while an even layer lets the pointed top, side branches, and short trunk show through. The dough portions are small, so keep the sauce spread across the surface instead of letting it pool at the edges. You’ll still get a cheesy, well-covered bite, but the outline stays clear enough to read as a tree on the plate.
What the Dough, Cheese, and Green Pepper Each Bring

- Prepared pizza dough — A prepared dough gives these individual pizzas their chewy base without needing a separate dough-making step. Choose a dough that feels pliable rather than stiff, and let it come to room temperature before shaping. A grocery-store dough works well; a homemade pizza dough is also a practical substitute if you use the same total amount.
- Pizza sauce — Pizza sauce is usually thick enough to spread over a small crust without running off the edges. If you’re out, use a thick marinara spoon-for-spoon; a watery sauce can soak into the dough and make the center soft. Keep the sauce layer modest so it doesn’t cover the tree outline.
- Low-moisture mozzarella — This cheese melts into the familiar stretchy topping without releasing as much moisture as fresh mozzarella. Pre-shredded mozzarella is convenient and works well here. Fresh mozzarella is a poor swap for these small crusts because its extra moisture can leave the surface wet.
- Mini pepperoni — The small pieces are easy to scatter across the branches and give each bite a little pepperoni. If you only have full-size pepperoni, chop it into small pieces so it distributes evenly instead of weighing down one spot.
- Green bell pepper — Fine dice lets the pepper settle across the cheese and keeps the branches recognizable. Choose a firm pepper with smooth, unwrinkled skin. Red bell pepper is an easy color and flavor variation, but it tastes sweeter and won’t give the pizzas the same green-tree look.
- All-purpose flour — This is for dusting the work surface, not for mixing into the dough. Use a light coating so the dough is easier to press without leaving a thick layer of raw flour underneath.
Shape and Top the Mini Pizzas Before the Oven Gets Busy
Set Up Both Baking Sheets
Heat the oven to 450°F and line two 13×18-inch baking sheets with parchment paper. Using two sheets gives the eight pizzas room to sit without crowding. Set the upper and lower oven racks in place before baking so both sheets can go in together. The parchment also keeps the dough from sticking to the pans.
Press the Dough Into Tree Shapes
Lightly dust your work surface with the flour, then divide the room-temperature dough into 8 equal pieces. Press each piece into a tree about 4 inches tall, with a pointed top, stepped branches, and a short trunk. If the dough keeps pulling back, give it a moment to relax and press again rather than stretching it into a long, thin shape. Keep the branches connected to the center so the outline stays sturdy.
Spread the Sauce and Share the Toppings
Arrange 4 dough trees on each prepared sheet, leaving space between them. Spread 1 tablespoon of pizza sauce over each tree, then divide the mozzarella, chopped mini pepperoni, and finely diced green bell pepper evenly among them. Distribute the toppings across the branches as well as the center. A balanced layer gives each pizza a good mix without hiding the shape.
Bake Until the Edges Turn Golden
Bake the sheets on the upper and lower oven racks for 10–14 minutes. Switch the sheets between racks and rotate them halfway through baking. Look for golden crust edges and bubbling cheese before taking the pans out. The two visual cues are more helpful than color on the cheese alone, since the crust needs time to bake through.
Easy Ways to Change the Toppings or Make a Gluten-Free Batch
Use Red Pepper for a Sweeter Topping
Replace the green bell pepper with the same amount of finely diced red bell pepper. It brings a sweeter, slightly fruitier bite and bright color, though the trees won’t have green branches. Keep the dice small so the pepper spreads neatly over the cheese.
Give the Cheese a Sharper Edge
Replace half of the low-moisture mozzarella with shredded provolone, keeping the total cheese amount the same. Provolone melts well alongside mozzarella and adds a more savory, slightly sharper flavor without making the topping as assertive as a full cheese swap.
Make the Trees Gluten-Free
Use 1 pound of prepared gluten-free pizza dough and gluten-free flour for dusting in place of the wheat dough and all-purpose flour. Some gluten-free doughs are more delicate, so press the branches gently rather than pulling them outward. The shapes may look a little less crisp, but the same sauce and toppings still work.
Storage and Reheating
- Refrigerator: Refrigerate leftovers within 2 hours and keep them covered for 3–4 days. The crust softens as it sits, especially under the sauce and cheese.
- Freezer: Freeze cooled mini pizzas in a single layer until firm, then wrap each one airtight. They keep their best quality for about 1–2 months; thaw in the refrigerator before reheating.
- Reheating: Warm them on a baking sheet in a 350°F oven until the centers reach 165°F. Avoid the microwave if you want the crust to stay firmer; it tends to turn soft and chewy.
Questions That Come Up When Shaping and Baking These Mini Pizzas
Christmas Tree Mini Pizza
Ingredients
Equipment
Method
- Heat the oven to 450°F.
- Line two 13x18-inch baking sheets with parchment paper.
- Lightly dust a work surface with the flour.
- Divide the dough into 8 equal pieces.
- Press each piece into a tree shape about 4 inches tall, with a pointed top, stepped branches, and a short trunk.
- Arrange 4 dough trees on each baking sheet, leaving space between them.
- Spread 1 tablespoon of pizza sauce over each tree.
- Divide the mozzarella, pepperoni, and bell pepper evenly among the trees.
- Bake on the upper and lower oven racks for 10–14 minutes, switching and rotating the sheets halfway through, until the crust edges are golden and the cheese is bubbling.