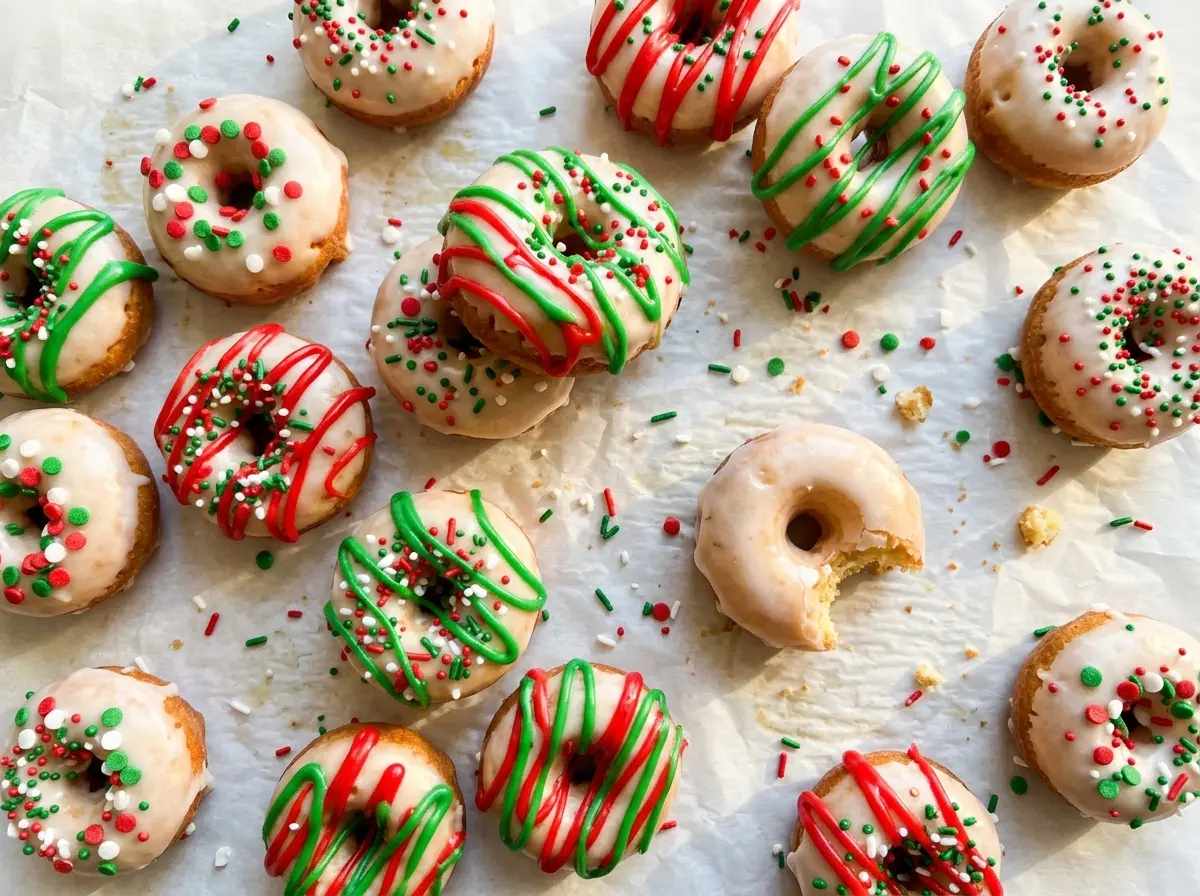
The first thing I noticed with mini donuts is how quickly a full pan can turn into a sticky little mess if the cavities aren’t greased well. These Christmas Mini Donuts are baked in two rounds, so the pan gets a chance to cool between batches, and each donut comes out tender with a light nutmeg note under the sweet glaze. The size makes them easy to dip, and the red and green sprinkles give every top a festive finish.
I keep the batter simple and stir it only until the dry flour disappears. Mini donuts don’t need a long mixing session; a few small lumps are better than a tough, overworked crumb. The oven does the rest, and the spring-back test tells me when they’re ready without waiting for the tops to brown. Once the donuts are completely cool, the glaze clings neatly instead of sliding off, leaving a bright, glossy cap with sprinkles in every bite.
Kitchen Note
For a glaze that dips easily but still coats the tops, add the extra milk in tiny splashes. I stop when it looks smooth and fluid, not watery; a thin glaze runs right off these little donuts.
Save these Christmas Mini Donuts for a batch of tender, nutmeg-scented bites with glossy glaze and cheerful red and green sprinkles.
Why Filling Mini Donut Cavities Only Two-Thirds Full Matters
A mini donut pan gives you a narrow ring of space for the batter to rise. Fill the cavities too high and the center hole can close as the batter puffs, leaving you with little round cakes instead of recognizable donuts. Two-thirds full gives the batter room to rise while keeping the ring shape intact.
These bake fast, so color isn’t the cue I rely on. The tops may stay fairly pale even when the centers are set. A light touch is more useful: a ready donut springs back rather than holding a dent. If you’re unsure, check at the shorter end of the baking window; a few extra minutes can dry out a small baked good faster than you’d expect.
The pan also needs a little patience between rounds. Donuts rest in the hot pan briefly before they move to the rack, and the pan itself cools before it gets greased for the remaining batter. That pause makes the second batch easier to release and keeps the cooking rhythm consistent across all 24 donuts.
What Gives These Mini Donuts Their Tender Crumb and Clean Glaze

- All-purpose flour — It gives the donuts enough structure to hold their ring shape without making them bread-like. A standard store-brand bag works well here; sifted cake flour would make the crumb more delicate and less sturdy for dipping. For a gluten-free version, use a measure-for-measure baking blend that includes a binder, but expect a slightly different, sometimes denser crumb.
- Nutmeg — A small amount gives the batter its warm, classic donut-shop note. Freshly grated nutmeg smells stronger, but ground nutmeg from the spice jar is convenient and works just fine. Ground cinnamon can replace it for a more familiar cinnamon-forward taste.
- Milk and unsalted butter — Together they add moisture and a soft, rich crumb. Use plain dairy milk and real butter for the familiar result; unsweetened plain oat or soy milk and a dairy-free baking butter are practical swaps if you need to avoid dairy. The dairy-free batch may taste a little less rich, but the batter still comes together the same way.
- Vanilla extract — It rounds out both the nutmeg batter and the sweet glaze. Pure extract has a fuller aroma, though imitation vanilla works when that’s what you have. Keep the vanilla in the glaze too; it keeps the powdered-sugar sweetness from tasting one-note.
- Confectioners’ sugar — Its fine texture makes a smooth glaze without a gritty finish. Granulated sugar won’t dissolve into the same silky coating, so this isn’t a good place to substitute it. Pick sprinkles that hold their color and crunch; any festive color combination works in place of red and green.
Mixing and Baking the Donuts Without Toughening Them
Whisk the Dry and Wet Mixtures Separately
Heat the oven to 350°F and grease the 12-cavity mini donut pan with some of the cooking spray. In a medium bowl, whisk together the flour, granulated sugar, baking powder, salt, and nutmeg so the leavening and spice are spread through the flour. In a separate bowl, whisk the egg, milk, melted butter, and vanilla until combined. Keeping the wet and dry mixtures separate until the pan is ready helps you avoid stirring the batter longer than necessary.
Stir Just Until the Flour Disappears
Pour the wet mixture into the dry ingredients and stir until no dry flour remains. Stop there, even if you can still see a few small lumps; chasing a perfectly smooth batter makes it easier to overmix. The finished batter should be thick enough to settle into the cavities without running like a liquid. Spoon or pipe it into each opening, filling each about two-thirds full.
Bake the Two Rounds and Check for Spring-Back
Bake the first pan for 8–10 minutes, checking for a donut that springs back when lightly touched. Let the donuts rest in the pan for 5 minutes, then transfer them to a wire rack. Allow the pan to cool before greasing it with the remaining cooking spray and filling it with the rest of the batter. Bake the second round for 8–10 minutes, then cool those donuts in the pan for 5 minutes and move them to the rack to cool completely.
Dip, Sprinkle, and Let the Glaze Set
Whisk the confectioners’ sugar with the milk and vanilla until smooth. If the glaze feels too thick to dip, add more milk a little at a time rather than pouring in a large splash. Dip the tops of the completely cooled donuts, then add the sprinkles right away while the glaze is still wet. Set the donuts aside until the coating has stopped looking glossy and feels set before serving.
Simple Changes for a Different Batch of Christmas Mini Donuts
Switch the Nutmeg for Cinnamon
Use ground cinnamon in place of the nutmeg for a warmer, more familiar cinnamon-donut flavor. The texture stays the same, but the spice reads sweeter and less aromatic than nutmeg.
Make Them Dairy-Free
Replace the milk in both the batter and glaze with unsweetened plain oat or soy milk, and use dairy-free baking butter in the batter. The donuts keep their soft, baked texture, though the butter flavor will be a little less pronounced. This adaptation still contains egg.
Change the Sprinkle Colors
Use another color mix of sprinkles to match a different celebration or the colors you already have in the cupboard. The flavor and texture don’t change, but the tops look less specifically Christmas-themed.
Storage and Reheating
- Refrigerator: Keep the glazed donuts in an airtight container for up to 3 days. The glaze may soften and become a little tacky in the refrigerator.
- Freezer: Freeze the cooled donuts without glaze in a sealed freezer container for up to 2 months. Thaw at room temperature, then glaze and decorate.
- Reheating: Warm an unglazed donut in the microwave for about 5 seconds if you’d like it warm, then add glaze. Heating glazed donuts can melt the coating and make the sprinkles slide.
Questions That Come Up When Baking Mini Donuts
Christmas Mini Donuts
Ingredients
Equipment
Method
- Preheat the oven to 350°F.
- Grease a 12-cavity mini donut pan with some of the nonstick cooking spray.
- Whisk the all-purpose flour, granulated sugar, baking powder, salt, and ground nutmeg in a medium bowl.
- In a separate bowl, whisk the egg, milk, melted butter, and vanilla extract.
- Pour the wet ingredients into the dry ingredients.
- Stir just until no dry flour remains.
- Fill the pan cavities about two-thirds full.
- Bake for 8–10 minutes, until the donuts spring back when lightly touched.
- Cool the donuts in the pan for 5 minutes.
- Transfer the donuts to a wire rack.
- Let the pan cool.
- Grease the pan with the remaining cooking spray.
- Fill the pan with the remaining batter.
- Bake for 8–10 minutes, until the donuts spring back when lightly touched.
- Cool the donuts in the pan for 5 minutes.
- Transfer the donuts to the rack.
- Cool all the donuts completely.
- Whisk the confectioners’ sugar, 2 tablespoons milk, and vanilla extract until smooth, adding more milk a little at a time if needed for a dippable glaze.
- Dip the tops of the cooled donuts in the glaze.
- Add the red and green sprinkles right away.
- Let the glaze set before serving.