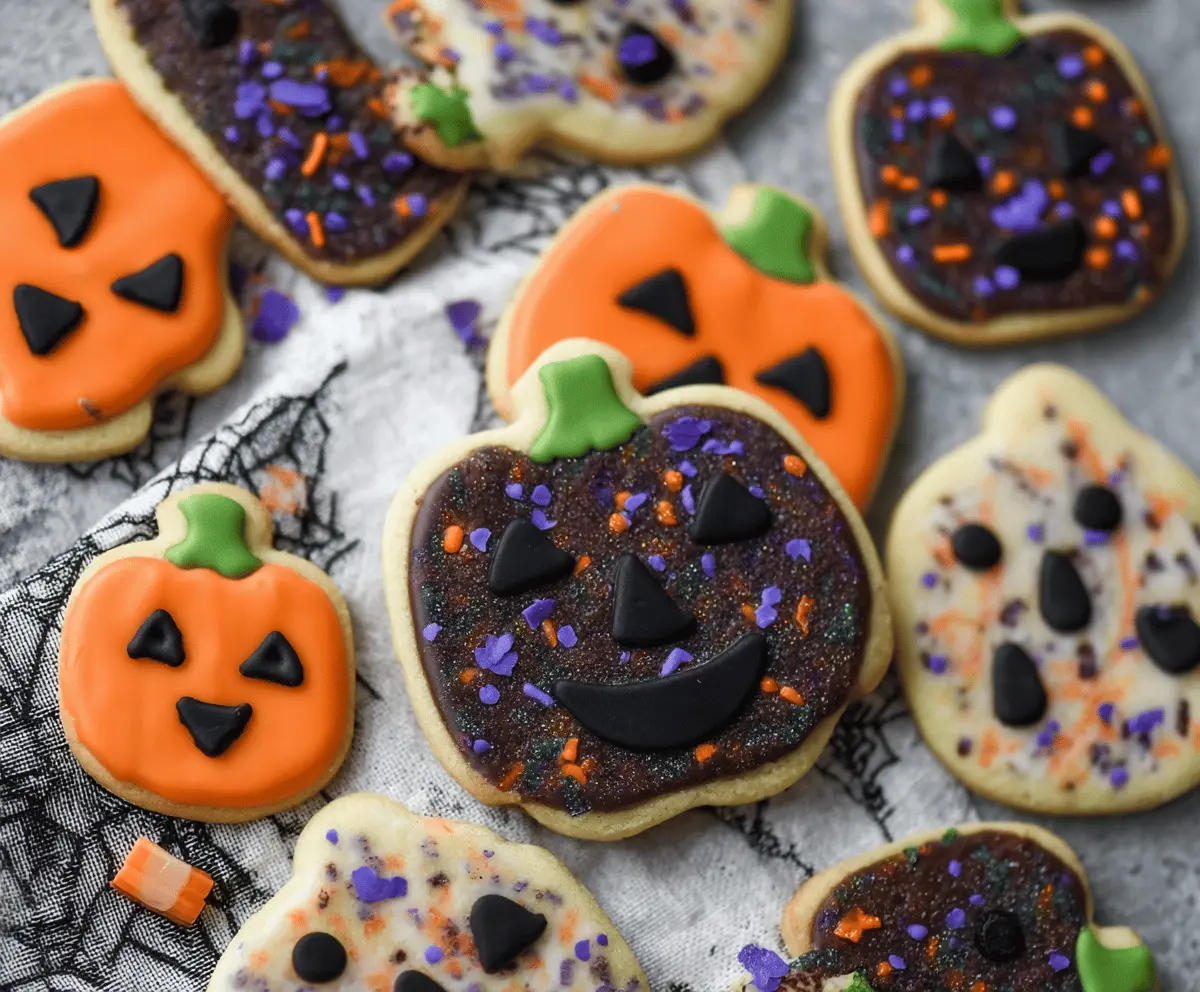
These Halloween Shortbread Cookies are fun and tasty! With a buttery, crumbly texture, they’re perfect for decorating with colorful icing or sprinkles to match the spooky season.
Who doesn’t love a sweet treat that looks as good as it tastes? I like to make them with my kids and see who can create the spookiest design. It’s such a blast! 🎃
Key Ingredients & Substitutions
Unsalted Butter: This is key for a rich flavor in shortbread. If you’re out, you can use margarine or coconut oil for a dairy-free option, though it might change the texture slightly.
Powdered Sugar: This sugar gives the cookies a sweet touch and helps create a soft texture. If you’re avoiding refined sugar, try a powdered sugar alternative like coconut sugar, though it can affect appearance.
All-Purpose Flour: It helps create that classic shortbread crumb. For gluten-free needs, use a gluten-free flour blend, but check if it requires any binders like xanthan gum.
Food Coloring Gels: These make your cookies festive! If you prefer natural options, try beet juice for red, turmeric for yellow, or matcha for green. They might give a different shade, but it’ll be fun!
How Do I Get the Perfect Shortbread Texture?
Getting the right texture is essential for yummy shortbread cookies. Here’s how to make them just right:
- Be careful not to overmix the dough after adding flour. It should just come together to keep that tender crumb.
- Chilling the dough is a must! It prevents spreading while baking, and helps the flavors meld beautifully.
- When rolling out the dough, keep it around 1/4 inch thick. Thinner cookies can get too crisp.
- Watch the baking time closely. You want edges to be firm but not browned, so keep an eye on them during the last few minutes.
With these tips and substitutions, you’re set to make some delightful Halloween Shortbread Cookies that everyone will enjoy! Happy baking!
How to Make Halloween Shortbread Cookies
Ingredients You’ll Need:
- For the Cookies:
- 1 cup unsalted butter, softened
- 1/2 cup powdered sugar
- 1 tsp vanilla extract
- 2 cups all-purpose flour
- 1/4 tsp salt
- 1/2 cup mini chocolate chips (for eyes and mouth details)
- Food coloring gels (orange, green, purple, black)
- Halloween-themed sprinkles (orange, black, purple, green)
- For the Royal Icing:
- 1 cup powdered sugar
- 2-3 tbsp milk
- 1/2 tsp vanilla extract
How Much Time Will You Need?
This recipe will take about 30 minutes of active prep time, plus chilling time of around 1 hour. Baking will take 12-15 minutes, and then you’ll need some time for decorating. Altogether, you can expect about 2 hours before these cookies are ready to enjoy.
Step-by-Step Instructions:
1. Make the Dough:
In a large bowl, take the softened butter and powdered sugar, and beat them together until creamy. Stir in the vanilla extract until well mixed. It should look smooth and fluffy!
2. Mix the Dry Ingredients:
In another bowl, whisk together the flour and salt. Gradually add this dry mixture to the butter mixture, stirring until it all comes together into a smooth dough. You want a consistent texture without any lumps!
3. Chill the Dough:
Wrap the dough in plastic wrap or place it in an airtight container. Chill it in the refrigerator for at least 1 hour. This step helps the cookies hold their shape when baked.
4. Preheat the Oven:
While the dough chills, preheat your oven to 325°F (163°C) so it’s ready for baking.
5. Roll Out the Dough:
Once the dough is chilled, roll it out on a lightly floured surface. Aim for about 1/4 inch in thickness; this helps ensure they bake evenly.
6. Cut the Shapes:
Using Halloween-themed cookie cutters (like pumpkins, ghosts, witches, and bats), cut out shapes from the rolled dough. Place them on a parchment-lined baking sheet for easy baking.
7. Add Fun Details:
If you’re making ghost cookies, gently press mini chocolate chips into the dough to create eyes and mouth details before you bake them. How cute!
8. Bake the Cookies:
Pop the baking sheet into the oven and bake the cookies for 12-15 minutes. Look for the edges to be set and firm. They shouldn’t brown too much!
9. Cool the Cookies:
After baking, carefully transfer the cookies to a wire rack to cool completely. This step is key before you start decorating!
10. Prepare the Royal Icing:
While the cookies cool, make the royal icing. Mix the powdered sugar, vanilla extract, and milk in a bowl until smooth and pipeable. Divide the icing into smaller bowls, adding food coloring gels to create different colors for your decorations.
11. Get Creative with Decoration:
Now comes the fun part! Decorate your cookies. For pumpkins, spread orange icing and pipe on black faces. For ghosts, spread white icing and use more black icing for features. Feel free to use sprinkles for extra flair on bats or ghosts!
12. Let Icing Set:
Allow the icing to set completely—this usually takes around 30 minutes to 1 hour—before serving or storing them. This ensures your designs remain beautiful!
And there you have it! These Halloween Shortbread Cookies are not only tasty but also so much fun to make and decorate. Enjoy sharing them with family and friends during the spooky season! 🎃👻
Can I Use Different Types of Flour?
Absolutely! You can substitute all-purpose flour with a gluten-free flour blend if needed. Just make sure it’s suitable for baking and check if it requires any binders like xanthan gum.
How Do I Store Leftover Cookies?
Store leftover cookies in an airtight container at room temperature for up to 5 days. If you live in a humid area, consider refrigerating them to keep them crisp.
Can I Freeze the Cookie Dough?
Yes, you can freeze the cookie dough! Wrap it tightly in plastic wrap and then place it in a freezer-safe bag. It will keep well for up to 3 months. When you’re ready to bake, thaw it in the fridge before rolling and cutting out shapes.
How Can I Make the Icing Color More Vibrant?
To achieve brighter colors in your royal icing, use gel food coloring instead of liquid. Gel provides more vibrancy without altering the consistency of the icing, helping create eye-catching designs!