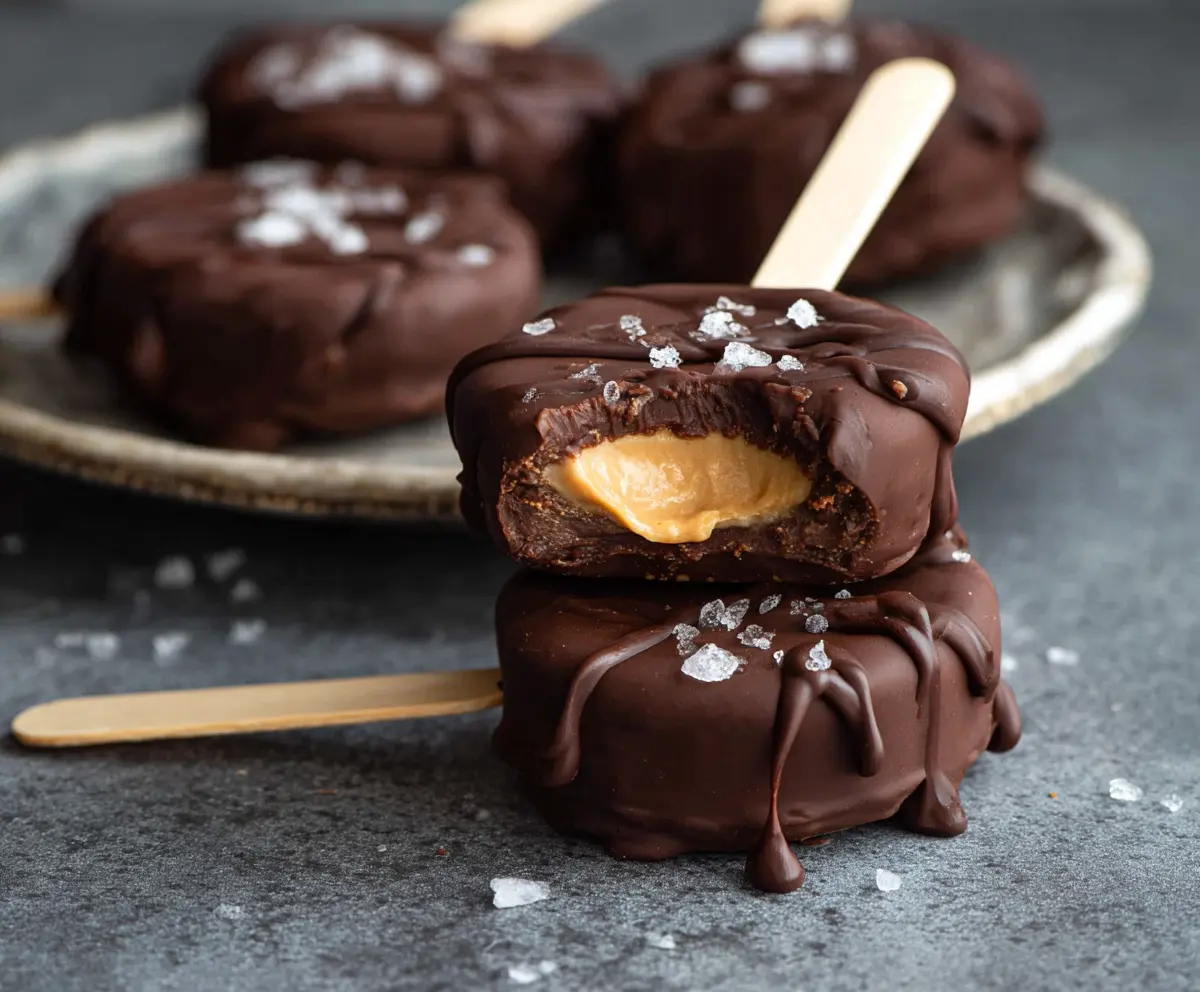
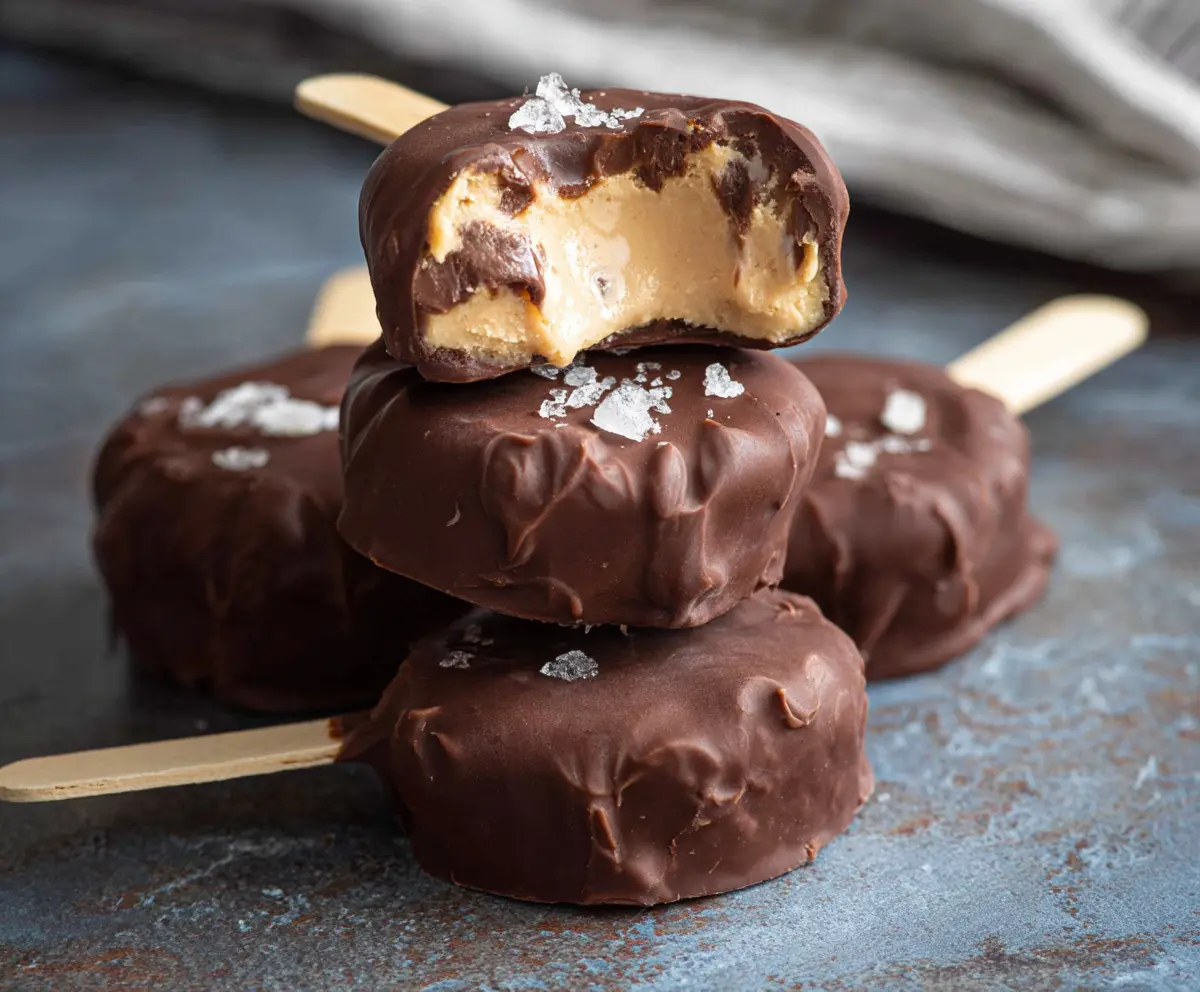
These Chocolate Peanut Butter Frozen Yogurt Bites are a cool and creamy treat! They combine rich chocolate with the nuttiness of peanut butter, making each bite a little piece of heaven.
They’re super easy to make—just mix, freeze, and enjoy! I love munching on them during movie nights; they taste like dessert without all the guilt! 😋
Key Ingredients & Substitutions
Greek Yogurt: I recommend plain or vanilla Greek yogurt for creaminess and protein. If you’re looking for a dairy-free option, coconut yogurt works great and adds a nice flavor.
Cocoa Powder: Unsweetened cocoa powder gives that rich chocolate taste. If you want something sweeter, consider using Dutch-processed cocoa for a different flavor profile.
Sweeteners: Honey or maple syrup both add sweetness. Adjust the amount based on your taste. For a lower-calorie option, you can use stevia or another sugar substitute.
Peanut Butter: Creamy peanut butter is best for a smooth texture. You can substitute almond butter or sunbutter if you’re avoiding peanuts or are nut-free.
Chocolate: Dark chocolate is a personal favorite for its depth. If you prefer, use milk chocolate for a sweeter bite or dairy-free chocolate for a vegan alternative.
How Do I Make Sure My Chocolate Coating is Perfect?
Dipping your bites in chocolate is what makes them special. Here are some tips for a smooth coating:
- Melt the chocolate gradually; it’s easy to overheat it. Use 30-second intervals and stir well.
- Add coconut oil to the chocolate; this makes it thinner and easier to work with. It also helps the coating harden better.
- Let the excess chocolate drip off before placing the bites back on parchment. This will prevent them from looking lumpy.
With a little patience and these tips, you’ll achieve a beautiful, shiny finish every time!
Chocolate Peanut Butter Frozen Yogurt Bites
Ingredients:
- 1 cup plain or vanilla Greek yogurt
- 1/4 cup cocoa powder
- 2-3 tablespoons honey or maple syrup (adjust to taste)
- 1/2 cup creamy peanut butter
- 6 oz dark or semi-sweet chocolate, chopped
- 1 teaspoon coconut oil (optional, for smoother chocolate coating)
- Sea salt flakes for garnish
- Popsicle sticks or mini wooden sticks
How Much Time Will You Need?
This delicious treat takes about 30 minutes of active prep time, plus around 3 hours of freezing time (2 hours for the yogurt rounds and 30 minutes after adding the peanut butter and chocolate). It’s perfect for a fun snack or treat on a hot day!
Step-by-Step Instructions:
1. Prepare Your Baking Sheet:
Start by lining a baking sheet or plate with parchment paper. This will help prevent the yogurt bites from sticking so you can easily remove them later.
2. Mix the Yogurt Mixture:
In a medium-sized bowl, mix the Greek yogurt, cocoa powder, and honey (or maple syrup). Stir well until the mixture is completely smooth and all ingredients are combined. Make sure to taste it and adjust the sweetness if needed!
3. Spoon Out the Yogurt Rounds:
Using a spoon or a piping bag, carefully spoon or pipe the chocolate yogurt mixture onto the prepared parchment paper. Aim for small rounds about 1.5 to 2 inches in diameter.
4. Insert Popsicle Sticks:
Gently insert a popsicle stick into the center of each yogurt round. Make sure it stands upright but doesn’t go all the way through. This will serve as your handle!
5. Freeze the Yogurt Rounds:
Place the baking sheet in the freezer and let the yogurt rounds freeze for at least 2 hours, or until they are completely firm. This step is essential for getting the right texture!
6. Prepare the Peanut Butter Filling:
Once the yogurt rounds are frozen, take them out and use a small spoon or melon baller to scoop out a tiny indentation in the center of each round, about half an inch deep.
7. Add the Peanut Butter:
Fill each indentation with creamy peanut butter. You can be generous here—this is the best part!
8. Freeze Again:
Return the yogurt bites to the freezer for about 30 minutes to firm up the peanut butter filling.
9. Melt the Chocolate:
While the peanut butter is firming up, melt the chopped chocolate and coconut oil in a microwave-safe bowl. Heat in 30-second bursts, stirring in between, until the chocolate is smooth and melted.
10. Coat the Yogurt Bites:
Carefully dip each frozen yogurt bite into the melted chocolate, allowing any excess chocolate to drip off. Make sure they’re fully coated for that delicious chocolate shell!
11. Add Sea Salt:
Place the coated bites back on the parchment paper and sprinkle a little sea salt on top immediately while the chocolate is still warm.
12. Final Freeze:
Return the yogurt bites to the freezer for at least another 30 minutes until the chocolate is completely set.
13. Serve and Enjoy:
Once set, take these delightful frozen yogurt bites out of the freezer and serve! Enjoy each creamy, chocolatey, peanut buttery bite, and store any leftovers in an airtight container in the freezer.
These bites blend the tanginess of yogurt with the richness of chocolate and the smoothness of peanut butter, creating a deliciously satisfying treat! Enjoy your dessert! 🍫🥜
Can I Use Different Types of Yogurt?
Absolutely! While Greek yogurt is recommended for its creaminess, you can use plain or vanilla yogurt, including dairy-free options like coconut or almond yogurt, to suit your dietary needs.
How Long Can I Store These Frozen Yogurt Bites?
Store any leftover chocolate peanut butter bites in an airtight container in the freezer for up to 2 months. Just make sure to separate layers with parchment paper to prevent sticking!
Can I Substitute Other Nut Butters?
Yes! If you need a nut-free option, sunflower seed butter is a great substitute for peanut butter. Almond butter also works well if you’re okay with nuts!
What If My Chocolate Isn’t Coating Smoothly?
If your chocolate isn’t coating smoothly, try adding a teaspoon of coconut oil while melting to help achieve a smoother consistency. Be sure to temper your chocolate properly by melting it in shorter bursts and stirring frequently!